
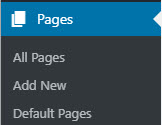
Pages
Creating PagesCreating Pages
To create a new Page, log in to your WordPress installation with sufficient admin privileges to create new pages. Select the Pages > Add New option to begin writing a new Page.
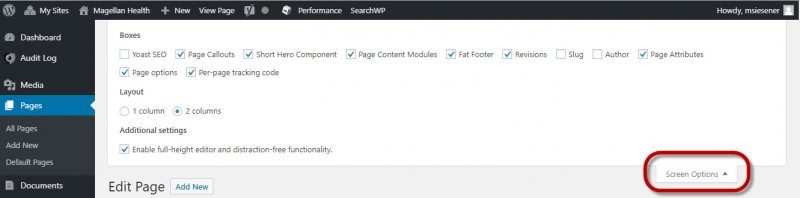
Screen Options
The Screen Options allow you to choose which modules are displayed, or not displayed, in the underlying Screen. Clicking on the Screen Options tab shows a list of the columns with a check-box next to each column. Check the box for each module you want displayed, or uncheck the box to not display that module. Click the Screen Options tab again to close the Screen Options. These options are saved so that you can customize how your own editing screen looks. So if modules such as Custom Fields, Discussion, Slug and Post Author are hidden from view use the Screen Options to expose those modules.
Expanding, Collapsing, and Rearranging, Modules
The modules, Publish, Page Attribute, Features Image and others, can be expanded, or collapsed, by clicking on the module title bar.
In addition, those modules can be moved by hovering the mouse cursor over the module title bar, when the mouse cursor changes to 4-arrows, hold the left-mouse button down, drag the module to where you want to place it, then release the mouse button (this is called drag-and-drop).
Add New Page
- Title – You can use any words or phrases. Avoid using the same title twice as that will cause problems. You can use commas, apostrophes, quotes, hypens/dashes, and other typical symbols in the page. WordPress will clean it up for the link to the page, called the slug.
- Page Editing Area –The blank box where you enter your writing, links, links to images, and any information you want to display on your site. You can use either the Visual or the Text view to compose your posts.
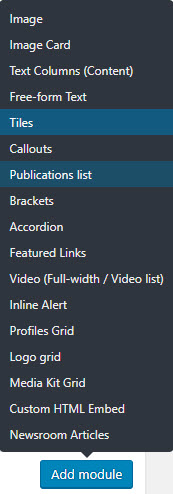
- Modules – You will need to select the appropriate module which will determine the format of the page. Available modules are shown below. For additional information regarding Modules, click here.
- Preview button – Allows you to view the page before officially publishing it.
- Publish box – Contains buttons that control the state of your page. The main states are Published, Pending Review, and Draft.
- Published status means the page has been published on your blog for all to see.
- Pending Review means the draft is waiting for review by an editor prior to publication.
- Draft means the page has not been published and remains a draft for you. If you select a specific publish status and click the update page or Publish button, that status is applied to the page. For example, to save a page in the Pending Review status, click Edit link of Status and select Pending Review from the drop-down box, click OK to close the drop-down box and click Save As Pending button. (You will see all pages organized by status by going to Pages > All Pages). To schedule a page for publication on a future time or date, click “Edit” in the Publish area next to the words “Publish immediately”. You can also change the publish date to a date in the past to back-date pages. Change the settings to the desired time and date. You must also hit the “Publish” button when you have completed the page to publish at the desired time and date.
- Permalink – After you save your page, the Permalink below the title shows the potential URL for the page, as long as you have permalinks enabled. (To enable permalinks, go to Settings > Permalinks.) The URL is generated from your title. In previous versions of WordPress, this was referred to as the “page-slug.” The commas, quotes, apostrophes, and other non-HTML favorable characters are changed and a dash is put between each word.
- Save – Allows you to save your page as a draft / pending review rather than immediately publishing it. To return to your drafts later, visit Pages > All Pages from dashboard, then click your page title from the list.
- Publish – Publishes your page on the site. You can edit the time when the page is published by clicking the Edit link above the Publish button and specifying the time you want the page to be published. By default, at the time the page is first auto-saved, that will be the date and time of the page within the database.
- Parent – Parent page controls how deep your page hierarchy goes.
- Template – Some Themes have custom templates you can use for certain pages that might have additional features or custom layouts. If so, you’ll see them in this drop-down menu.
- Order – Page order to sort the list of Pages.
Organizing Your PagesOrganizing Your Pages
Just as you can have subcategories within your Categories, you can also have sub-pages within your Pages, creating a hierarchy of pages.
For example, the About page for magellanhealth.com would have sub-pages for Overview, Magellan’s Values, Leadership Team, etc. The Who we are page for mccoffl.com would feature sub-pages of Our commitment, Service area and Health plan performance.
The structure of the pages on the site would then look like this.
- About
- Overview
- Magellan’s Values
- Leadership Team
- Who we are
- Our commitment
- Service area
- Health plan performance
To create a sub-pageTo create a subpage
- Go to Administration > Pages > Add New screen.
- In the right menu, click the “Page Parent” drop-down menu. The drop-down menu contains a list of all the Pages already created for your site.
- Select the appropriate parent Page from the drop-down menu to make the current Page a child Page.
- Add content to the sub-page.
- Click Publish when ready.
When your Pages are listed, the Child Page will be nested under the Parent Page. The Permalinks of your Pages will also reflect this Page hierarchy.
In the above example, the Permalink for the Overview Page would be:
https://magellanhealth.com/about/overview/
Changing the URL of Your PagesChanging the URL of Your Pages
To change the URL part containing the name of your Page, use the “Edit” button under the Page title on the Edit screen of the particular Page, accessible from Pages tab of WordPress Administration Screen.
Page Attributes
When creating a new page, you should first set your selections in the Page Attributes box. This will determine what Parent Page, if any, your page will be attributed to. You will also select the template you wish to use to determine the layout of your page. Finally, you will indicate the order the page will be listed in.
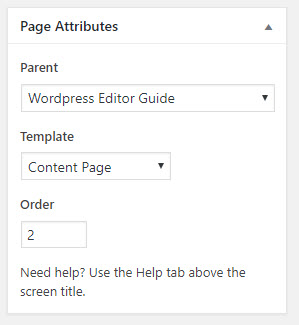
Parent
This field allows you to select the Parent your new page will be linked to. For example, you want to attribute the new About Us page to the main magellanhealth.com page.
Template
This field allows you to select the template you wish to us, which will control the layout of your page. The templates available can be found here.
Order
This field allows you to determine what order the page will appear below the Parent. You are also able to switch the order from the main Pages screen by clicking, holding and moving pages to their desired position.